GROWScience
Lesson overviewGROW · Week 4

Two lever positions, one load

Compare effort and hand travel.

Explain what changes when the pivot moves nearer the load.

Contextual illustration of a wooden lever on a triangular pivot with a small block as its load. It is not a measured result.Open image full size
Two lever positions, one loadSlide 1 of 15
StarterGROW · Week 4

Recover Monday’s lever rule

Point to the effort, pivot and load.

What might happen if the pivot moves near the load?

Choose to test, direct, observe or record.

Two lever positions, one loadSlide 2 of 15
StarterGROW · Week 4

Check the model before touching

Adult checks the lever, stable pivot and secured load.

Use a light load and a small lift target.

Keep hands clear of the pivot.

Never flick the lever or launch the load.

Two lever positions, one loadSlide 3 of 15
You Do · practiseGROW · Week 4

What stays the same?

The same light load

The same effort point

The same small height the load rises

The same way of judging or measuring effort

Two lever positions, one loadSlide 4 of 15
You Do · practiseGROW · Week 4

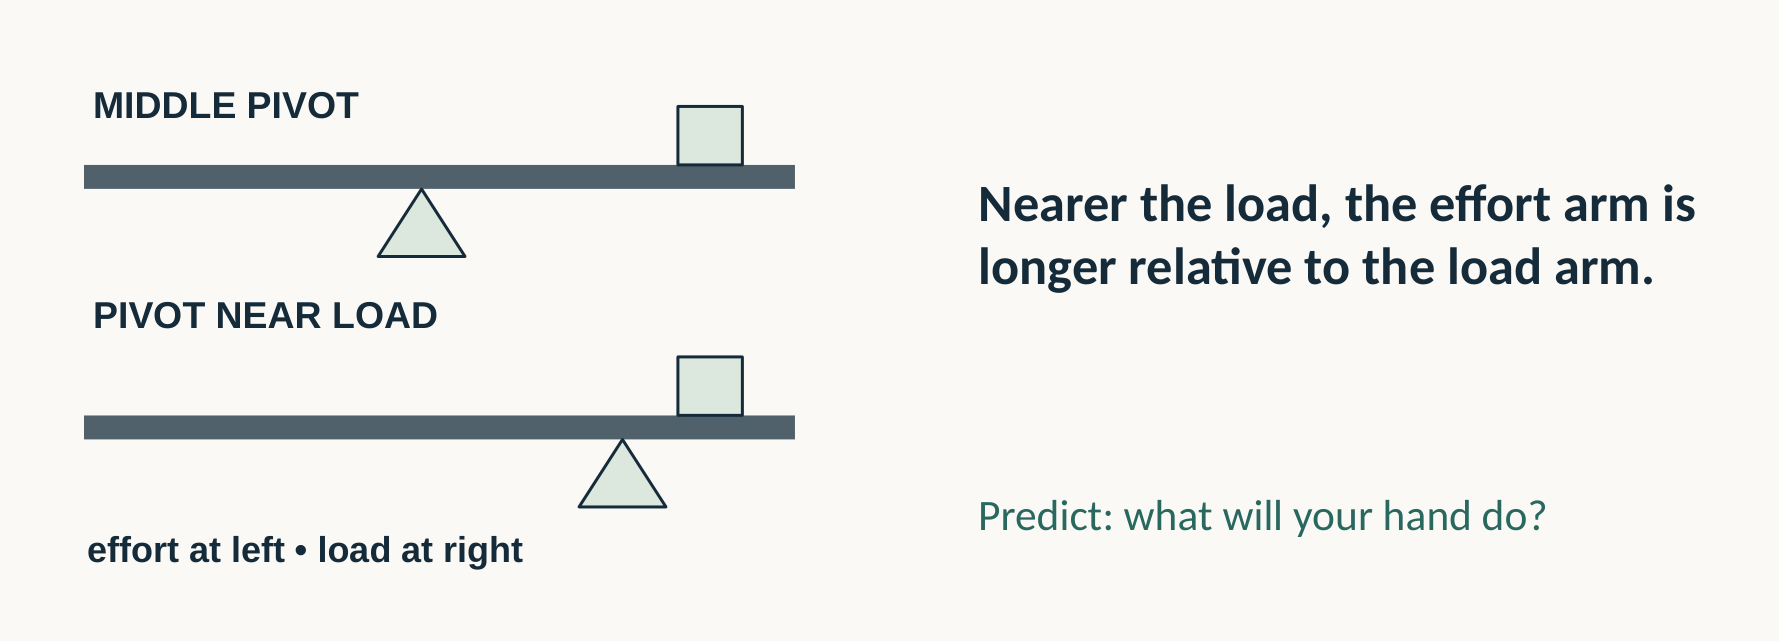
Compare the two arm lengths

Two levers are compared. Both have effort at the left and load at the right; the upper pivot is central and the lower pivot is near the load.
Original teaching-pack diagram and labels.
Open image full size
Read the slide text
Two levers are compared. Both have effort at the left and load at the right; the upper pivot is central and the lower pivot is near the load. MIDDLE PIVOT PIVOT NEAR LOAD effort at left • load at right Nearer the load, the effort arm is longer relative to the load arm. Predict: what will your hand do?
Two lever positions, one loadSlide 5 of 15
You Do · practiseGROW · Week 4

Try the middle pivot

Adult checks the middle pivot mark.

Raise the load to the small target height.

Notice the effort and the hand’s travel.

Record what you observed.

Two lever positions, one loadSlide 6 of 15
You Do · practiseGROW · Week 4

Try the pivot nearer the load

Adult moves the pivot to its second mark.

Keep the same load, effort point and load rise.

Does it feel easier, similar or harder?

Compare hand travel with the first position.

Two lever positions, one loadSlide 7 of 15
You Do · practiseGROW · Week 4

Make your record precise

RECORD FOR BOTH POSITIONSUSE HONEST EVIDENCE
Same load/rise checked? Effort: easier/similar/harder Hand travel: what changed?Observation is valid evidence. Add cm only if measured. Add N only with a force meter.
Two lever positions, one loadSlide 8 of 15
You Do · practiseGROW · Week 4

Pause: was the comparison fair?

Did the load stay the same?

Did it rise to the same target height?

Did the effort act at the same point?

Name one observation you want to check.

Two lever positions, one loadSlide 9 of 15
You Do · practiseGROW · Week 4

Repeat one careful comparison

Correct one setup or recording issue.

Compare both positions again if safe.

Keep any earlier observation and explain the change.

Two lever positions, one loadSlide 10 of 15
You Do · practiseGROW · Week 4

Explain the gain and the trade-off

With the pivot nearer the load, our model felt ___. The hand travelled ___.

For the same load rise, a longer effort arm can trade a smaller force for more travel.

Two lever positions, one loadSlide 11 of 15
You Do · practiseGROW · Week 4

Tidy and keep the evidence

Label EFFORT, PIVOT and LOAD on the sketch.

Keep observations beside your explanation.

Return the light load and all small parts.

Two lever positions, one loadSlide 12 of 15
Lundy Loop · pupil voiceGROW · Week 4

What would help next time?

Did the equipment or waiting make learning harder?

Point, sign, speak, write—or pass privately.

Tell the adult teaching this lesson.

Agree one useful change and check whether it helps.

Two lever positions, one loadSlide 13 of 15
Exit checkGROW · Week 4

Show what you can explain

Supported: name the turning point of a lever.

Standard: why can a near-load pivot help lifting?

Stretch: explain why the benefit has a cost.

Two lever positions, one loadSlide 14 of 15
Exit checkGROW · Week 4

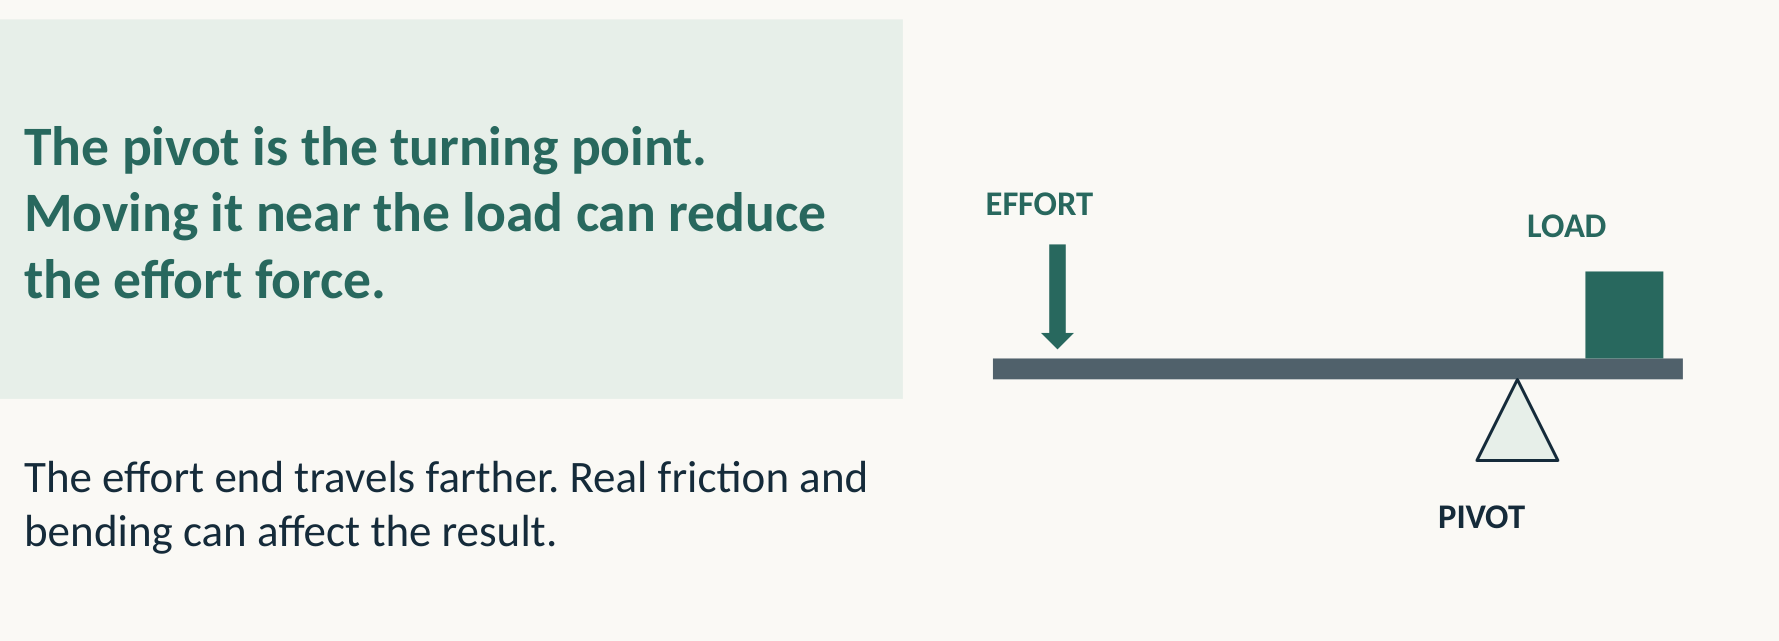
Check the force–distance trade-off

A lever has a downward effort arrow at its far left; its pivot is near the load at the right.
Original teaching-pack diagram and labels.
Open image full size
Read the slide text
A lever has a downward effort arrow at its far left; its pivot is near the load at the right. The pivot is the turning point. Moving it near the load can reduce the effort force. The effort end travels farther. Real friction and bending can affect the result. EFFORT LOAD PIVOT
Two lever positions, one loadSlide 15 of 15

Use the controls or left and right arrow keys. Printing includes pupil content; model answers remain separate.